Week 5 {tiny paintings project}


This Week: BADGE OF HONOR.
A prize for people who go out of their way to be nice. I'm making a bunch of them to hand out to all the people who have been so helpful with my new book project. No shirt pocket? You can fold the tab over a chain or ribbon and wear the badge as a necklace. Or, instead of the Museum badge style, you can mount the tiny painting on mat board, color the edges in silver, and glue a pin-back on it(like week 4 project).
Get the high res. artwork in the ARTWORK DOWNLOADS column to the right. I've had resizing problems printing it straight from my browser. I suggest you save the artwork and print it using a photo viewing application. Use 4" x 6" photo paper. Please leave a comment if you have printing suggestions.
And please, if you use my artwork, send me a picture of what you made, so I can pin it to my pinterest board.

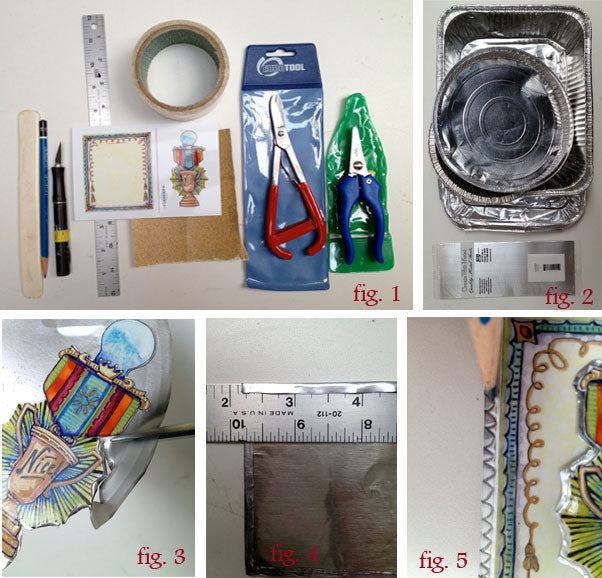
Fig. 1&2 Supplies: Wear gloves when cutting metal! If you are new to cutting metal, use an aluminum take out container or pie tin. If you’d like thicker metal, get a .016 aluminum sheet (I got this one at Ace hardware). Fine sand paper, bone folder, pencil, craft knife, ruler, and a cutting mat. Tape, this Letraset double-sided tape is nice because it has a paper backing so you can apply the tape to the back of the tiny painting printout, then cut through all the layers with the mat knife, making your own sticker. Metal shears, get small ones made for model making or jewelry. Large tin snips will be hard for this detailed work. The red ones are my favorite, blue are nice too.
Fig. 3 Cut as closely as possible to the edge of the badge artwork and then mount it on the sheet metal. Cut the metal around the artwork leaving an 1/8” border of metal showing. Don’t attempt to cut an inside curve with the shears. Snip into each groove from opposite sides. Use the bone folder to straighten out the metal but use a cover sheet so you don't scratch it. Lightly sand any sharp edges.
Fig. 4 Cut close to the edge of the certificate artwork, and then cut a piece of metal ¼” larger all the way around the certificate. Use the double-sided tape to mount the certificate to the backing and with the craft knife, cut a slit on the red line. With the certificate face down, fold 1/8” border back over the ruler to get a straight fold.
Fig. 5 Etch a decorative border with the pencil and insert the badge tab into the slot. You can write a reason for awarding the medal with a sharpie on the back, or print up an official looking statement and tape it to the back.