Your cart
Close Alternative Icon
New scarves!

News

Week 4 {tiny paintings project}

Week_4_webThis Week: LOLLIPOP LOVE.  Starting to think about Valentine's day. Here’s little treat, and on the tag, a ready-made poem from my thesaurus. To write your own, get the biggest Roget’s thesaurus you can find in the bookstore. An on-line thesaurus will produce inferior results.  Look up words that are common metaphors for the message you want to convey. For example: Tastiness. You find the poem: Tickle, flatter or delight the palate. Tempt, whet or feed the appetite. Make the mouth water.

Get the high res. artwork in the ARTWORK DOWNLOADS column to the right. I've had resizing problems printing it straight from my browser. I suggest you save the artwork and print it using a photo viewing application. Use 4" x 6" photo paper. Please leave a comment if you have printing suggestions.

And please, if you use my artwork, send me a picture of what you made, so I can pin it to my pinterest board.


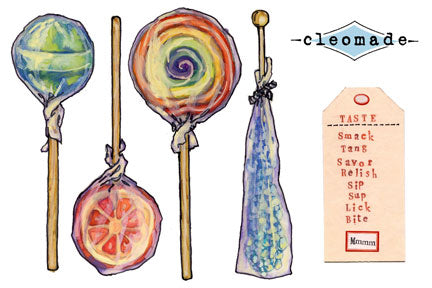
FIG. 1 Supplies: Mat board, not too thick. It will be hard to cut through with a knife. The thickness of the mat board depends upon how much experience you have cutting board. Less experience = thinner board.  Double stick tape, glue, or spray mount of your choice.  Lately I’ve found it easier to cover the whole back of the tiny painting printout with double stick tape, instead of dealing with glue or spray. Hole punch, ribbon, craft knife, gold marker. 

FIG. 2 Assembly. Mount the printout on the mat board and carefully cut out the lollypops and tag. Aim for cutting just outside the black line. If you have any rough spots after cutting, you can sand the edges with fine sandpaper, but proceed with caution. Over sanding makes fuzz! Punch a hole in the tag. If your mat board is thick, you may need to help out the hole punch with the craft knife. Color in the edges and anything outside the black outline with the gold marker. Then tie it all together.


Continue reading

Week 3 {tiny paintings project}

Week_03_sign

This Week: MISE EN PLACE MENU BOARD

“Mise en Place” means “putting in place” in French. It is a restaurant term referring to ingredients prepared beforehand. When someone says “Get your mise ready” it means, cut up all the vegetables, make sauces, gather ingredients and have it all in front of you ready to go. This week’s menu board can organize dinners, after school activities, workouts, or blog posts. You might want to make a tassle out of black felt for an eraser, attach it to a piece of chalk, and hang it from the menu board.

Get the high res. artwork in the ARTWORK DOWNLOADS column to the right. I've had resizing problems printing it straight from my browser. I suggest you save the artwork and print it using a photo viewing application. Use 4" x 6" photo paper. Please leave a comment if you have printing suggestions.

And please, if you use my artwork, send me a picture of what you made, so I can pin it to my pinterest board.

FIG. 1 Supplies: Chalkboard paint. I used a spray, but brush-on is good too. 30 tiny eye hooks size 17/32”. 14 jump rings, I happened to have these keychain style ones, but regular jewelry supply ones would be easier to use. An awl, pliers, tack cloth, scissors, ribbon. 4 jumbo size paint stirring sticks and a saw. Optional: tape for the edges. I got this foil tape at ace hardware and cut it down into ½” strips.

FIG. 2 Cut up the artwork close to the words.

FIG. 3 Cut and paint. Cut the paint stirring sticks into eight 8” lengths. Sand the edges and paint with chalkboard paint. I did 4 coats of spray on each side, sanding lightly in between coats.

FIG. 4 Tape edges.

FIG. 5 Insert screw eyes. Use the awl to start a hole 1” in from the edge. The top and bottom panels will only have hooks on one side.

FIG. 6 Attach the panels together with the jump rings.

FIG. 7 Glue on the art, and hang it with a ribbon.


Continue reading

Week 2 {tiny paintings project}

This week: LITTLE NOTEBOOKS


Make one of these little notebooks to keep random thoughts in your pocket. Or make one for each month, and write a few sentences every day. Wouldn't a set of 12 be beautiful, each with a different washi tape on the spines?

Get the high res. artwork in the ARTWORK DOWNLOADS column to the right. I've had resizing problems printing it straight from my browser. I suggest you save the artwork and print it using a photo viewing application. Use 4" x 6" photo paper. Please leave a comment if you have printing suggestions.


FIG. 1 Supplies: Standard size stapler with a minimum 3” reach, bone folder and a knife. You can use a variety of scrap or decorative paper; just make sure it is not thicker than standard weight printer paper. You’ll also need some clips. The small bulldog clips in fig. 6 tend to mark up the paper less. If you don’t like clip dents in your paper, sandwich a piece of chipboard between the two.  It gets a little fiddly with this tiny project though.

 FIG 2 The signatures. Cut 18 sheets of paper 4 ¼” x 5 ½”. Fold into 3 signatures of 6 sheets each.

 FIG. 3 Fold the spine. Use the bone folder. Make sure the artwork on the front and back match up when the book is closed.

 FIG. 4 Binding. Line up the crease in the first signature with the crease in the spine. The signature should be slightly offset inside the spine. Visualize how you will fit 3 signatures stacked up in that tiny spine. Clip it securely in place.

 FIG. 5 Stapling. Position the stapler just inside the red border on the artwork and push down hard. Close the first signature. Open the second, and line the crease up right in the middle of the spine. Fig. 5 shows the stapling of the second signature. Staple and repeat with the third signature.

 FIG. 6 Trimming. To trim through a large stack of paper you need patience and a very sharp knife blade. Make sure the artwork on the front and back cover matches up when the book is closed and clip the book in place. Leave a little white border outside the red border of the artwork and press down on the ruler securely. Really really securely! Start slicing through about two sheets of paper at a time. Use a gentle even pressure and do not change the angle of the knife blade until you are completely through the stack. Trim all three sides.

 FIG. 7 Labels. If you want to make 11 more notebooks, download the “Week 01” artwork and use the monthly labels for each book.

And please, if you use my artwork, send me a picture of what you made, so I can pin it to my pinterest board.

 
Continue reading

Week 1 {tiny paintings project}

Whole_timelineNew Year - New Project

This week: TICKER TAPE TIMELINE

Each week I'll post artwork and instructions for a new DIY project. Send me a picture of your timeline, and I’ll post it on my Pinterest board.  This month I’ll focus on projects for organizing the New Year.

Use today's printable clip art to make a timeline to keep track of monthly goals, projects, appointments, events, expenses, exercise, and/or birthdays.


Get the artwork in the ARTWORK DOWNLOADS column to the right. 


FIG. 1 Clean out the desk, and save a stack of paper, with color and style in mind.  It’s always good, when starting a project, to set some clear limitations. I used the insides of security envelopes, a few receipts, and index cards. So, my style plan is: office papers in a fade from natural to blue. You could use strips of fabric, ribbons, wrapping paper, wallpaper or old drawings.

FIG. 2 Supplies: Print out the timeline artwork on 4” x 6” photo paper. Don’t use the borderless setting. You’ll also need a roll of clear Con-tack paper, a piece of chipboard (like the back of a tablet), a tape measure or yard stick, self-stick notes in a color that goes with your paper scraps, a utility knife, blue tape (so you don’t peel the paint off your wall), a gold marker, a ruler and cutting board and your choice of adhesive. I used a combo of spray mount and double stick tape.

FIG. 3 Depending on how much space you need for notes, you may want to trim your self-stick notes. I trimmed an inch off each note and the total length of the timeline ended up being 41”.  To trim a stack of papers, firmly hold the ruler in place and repeatedly slice through about two pieces at a time with an even pressure and angle.

FIG. 4 Mount the artwork on the chipboard and trim the labels. Put double-stick tape on the back. Alternatively, make tape balls by folding the blue tape over onto itself. 

FIG. 5 Cut your collection of paper into ¼” strips with scissors. I like them to be a bit irregular.

FIG. 6 Tape the tape measure to a wall. You can work on a table or the floor, but I prefer to work on a wall-hung piece on a wall. Arrange the self-stick notes and labels along the ruler. I left 1 ¼” between each note.  Cut a strip of Con-tack paper about 1” bigger than your arrangement all the way around. My piece ended up being about 44 ½” long and 4 ¾” wide.  Tape the Con-tack paper to the wall next to your arrangement with the paper side out. Peel off the paper to reveal the adhesive.

 FIG. 7 The fun part: arrange the strips of paper, leaving a bit of adhesive showing between each strip. Refer to your timeline layout for your design. You may want to change colors each month, or put a certain color behind the labels.

FINISHING  Cut a second piece of contact paper a little wider all the way around than the first. Sandwich the strips of paper between the two adhesive sides of the Con-tack paper. Working from the top, unpeel a couple of inches of backing paper at a time, smoothing in between.  Trim the sides along the edge of the first piece of Con-tack paper.  Move the labels and self-stick notes to the timeline. To hang the piece I simply wrapped the top layer of Con-tack paper around a strip of chipboard and put pushpins through it.   But you could use pretty ribbon and tassels.

FINAL TOUCH  Use the gold marker to highlight the text on the labels.


Continue reading