Your cart
Close Alternative Icon
New scarves!

News

Week 14 {tiny paintings project}

 This Week: SUMMER CAMP NECKLACE

Week_14_web

Let the summer camp scheduling madness begin! Instead of trying to fill out all those online forms faster than the next person, imagine you are out in the woods whitteling youself a neclace.

Week_14_download_web

Get the artwork in the "artwork downloads" column to the right. Print it out on 4" x 6" photo paper and make sure the print size is 100%. You might need to save the file and print using a photo application.

And please, if you use my artwork, send me a picture of what you made, so I can pin it to my pinterest board.

Week_14_layout

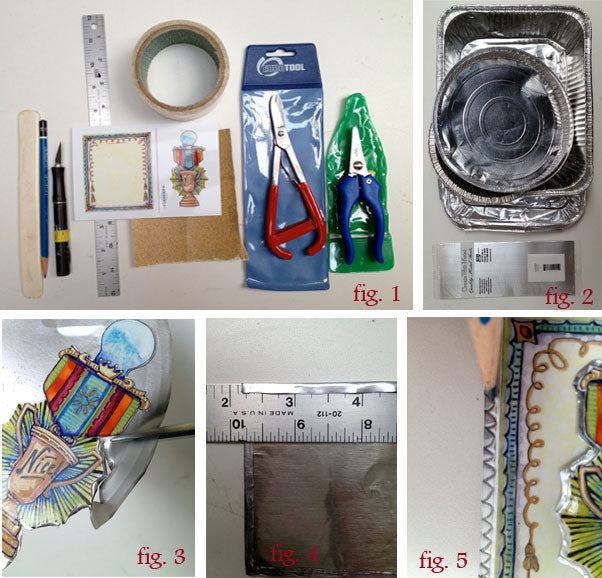
FIG. 1: Supplies. Find a tree with smooth bark that needs pruning. Trim a straight branch about 14” long with a 2” circumference on the thick end. You can measure 2” by cutting out the tallest tree picture and wrapping it around the branch (see fig. 11). Saw & miter box, drill with 9/64 bit, printout, scissors, Tacky glue & glue brush, clippers, 13 rubber bands, and a bamboo skewer, pliers (notice I wrapped the tips in tape to avoid scratching the bark), block of scrap wood, sandpaper, and cord (I used 46” each of blue and green for necklace, plus hemp twine for tassels).

FIG. 2 Clip knots off branch. Cut out landscapes and use them to measure lengths for beads. Cut beads about ¼” longer than each painting, starting at the thick end of the branch with the tallest paintings. Cut at least 8 beads, from the thin end of the branch as wide as the plaid trim. The small ones tend to crack so you might want a few extra.

FIG. 3 Drill holes in the end of each bead, holding it steady with pliers. If the paintings overlap the holes a bit, poke them out with a skewer later.

FIG. 4 Roll the sandpaper into a flat log. Sand the ends and centers of beads smooth, avoiding the rings of bark on the top and bottom.

FIG. 5 You should have 7 big beads and more than 8 little beads.

FIG. 6 Dry-fit a painting by wrapping it around its bead and trimming little bits off the bottom and sides until it no longer overlaps. Brush the back with glue.

FIG. 7 Secure the painting with a rubber band and let it dry. Wrap 6 beads with plaid, leaving 2 bare.

FIG. 8 Tassels. Loop twine through a plaid bead as many times as will fit, keeping the ends on the bottom.

FIG. 9 Apply a drop of glue to the loop end.

FIG 10 Slide the bead up to tighten the loop around the skewer, and remove the skewer.

FIG. 11 Thread the tallest bead to the center of the cord. Tie a knot on either side. Add 2 tassels next and then 2 more knots. Continue to the smallest landscape beads, and finish with 2 bare beads.

FIG. 12 Trim the ends of each tassel to be a little longer than its tallest neighbor.


Continue reading

Week 13 {tiny paintings project}

This Week: SPRING CHICKENS

Week_13
Happy Spring! These gift tags are mounted on thin plywood for a nice substantial feel. You could use card stock if you're making a bunch. Or use the art as a label, and glue it straight on a box.

Week_13_download_web

Get the artwork in the "artwork downloads" column to the right. Print it out on 4" x 6" photo paper and make sure the print size is 100%. You might need to save the file and print using a photo application.

And please, if you use my artwork, send me a picture of what you made, so I can pin it to my pinterest board.

Week_13_layout

FIG. 1 Supplies: I suggest you buy a coping saw and some fine blades. It is an inexpensive tool, and I'll be using it for future projects. 1/8" plywood a little bigger than the printout. Get it in the model making section of an art store, and make sure it is plywood, not balsa or veneer which will crack to easily. Drill, 100 grit sandpaper, tacky glue, glue brush, printout, scissors, bakers twine.

FIG. 2 Cut out the card, then trace around it on the plywood.

FIG. 3 Cut out the rectangle. Don't worry about rounding the corners.

FIG. 4 Round the corners with the sandpaper. And smooth out the edges.

FIG. 5 Glue the back of the card and brush it out evenly, starting at the center.

FIG. 6 Stick the card to the wood. Drill two holes in the top. If you want you can take the burr off the hole with a craft knife.

FIG. 7 Insert the thread, and tie the tag to your gift.

FIG. 8 Cut out the round seals. Put a dot of glue on the back of one. Stick it near the end of the twine, and sandwich another seal on top. Trim the ends of the twine to 1/2" and fringe.

Continue reading

Week 12 {tiny paintings project}

This Week: JACKALOPE NEST

Week_12

Here's a variation on an Easter basket, with three little Jackalope eggs. 

Week_12_download_web

Get the artwork in the "artwork downloads" column to the right. Print it out on 4" x 6" photo paper and make sure the print size is 100%. You might need to save the file and print using a photo application.

And please, if you use my artwork, send me a picture of what you made, so I can pin it to my pinterest board.

Week_12_layout_web

Fig. 1 Supplies: Poster board about twice the size of the printout. I used gold. It should be thicker than  card stock but thinner than mat board. There is a lot of cutting this week. 2 pieces of non-stick baking parchment the size of the printout. You could also use an empty sticker sheet. Small chocolate Easter eggs, craft knife, double-stick tape, four paper clips, and pretty paper scraps for nesting material.

FIG. 2 Cover the back of the printout with double-stick tape. Stick the printout to the baking parchment.

FIG. 3 Cut around the images. MAKE SURE TO LEAVE LITTLE TABS CONNECTING THE ANTLERS. Remove the parchment backing and stick one jackalope and the antlers to the poster board. Cover the back of the poster board with double-stick tape and apply the second piece of poster board to the back. So, sandwiched together you have: Cut-out jackalope, tape, shiny-side up poster board, tape, shiny-side down poster board.

FIG. 4 Cut through all the layers leaving a 1/8" border around everything except the tabs below the antlers.

FIG. 5 Remove the backing from the remaining jackalope and position it on the back of the cut-out stack. Open up the 4 paperclips to make an l-shaped stand, and insert them in between the feet.

FIG. 6 Open the edge of the foil egg and tear a slit in it.

FIG. 7 Separate the layers of the antler, fold them open, and cover both sides with double-stick tape.

FIG. 8 re-wrap the foil around the egg.

FIG. 9 cut thin strips of paper to make a nice fluffy nest.

Week_12_finished
The finished jackalope family. If you want less cutting you can also buy antlers here and make a bunch of jackalope eggs.

Jackalope_eggs

Continue reading

Week 11 {tiny paintings project}

This week: LUCKY COINS

Week_11
When designing your pot of gold coins, think like a leprachaun and get a little silly. What to do with them? Hand them out for good luck, wear them as a brooch, play some poker, hang them from strings like an ornament, act like a stylist and make a nice arrangement with them, or just give them to some kids and they'll show you what to do.

Week_11_download_web

Get the artwork in the "artwork downloads" column to the right. Print it out on 4" x 6" photo paper and make sure the print size is 100%. You might need to save the file and print using a photo application.

And please, if you use my artwork, send me a picture of what you made, so I can pin it to my pinterest board.

Week_11_layout

FIG. 1 Supplies: 3 poker chips for each coin. I've used the cheap ones here, but the pro. grade ones give a nice heavy weight to the coins. Two printouts if you want the same charm on the heads and tails of the coin. Tacky glue, scissors, and ruler. Continuing my obsession with crepe paper from Castle In The Air, I used gold, and light and dark green.

FIG. 2 Cut crepe paper into 1" x 4" strips with the grain running across the 1" side. Glue three poker chips in a stack. Then run a bead of glue around the edge and attach the crepe paper. Trim, allowing for a tiny overlap at the end.

FIG. 3 Glue and fold down the edges.

FIG. 4 Cut a 1/2" x 3" strip of a contrasting color crepe paper . Glue a ring on the face of the chip and stretch the outside edge of the paper as you press it down. If you get any glue on your fingers clean it off right away. It's not worth trying to do this with sticky fingers.

FIG. 4 Trim the overlap at the end and flatten it down.

FIG. 5 Cut out the charm and glue it in the middle.

Week_11_closeup

Get fancy with combinations and try different color edges,or green grass trim. I suppose you could decorate some chocolate coins this way too. What else would a leprachaun want?

Continue reading

Week 10 {tiny paintings project}

This Week: EASTER EGG TROPHIES

Week_10
Here's a way to add some height to Easter baskets or centrpieces. I used metalic crepe paper from Castle In The Air, that fades from copper to silver.

Week_10_download_web

Get the artwork in the "artwork downloads" column to the right. Print it out on 4" x 6" photo paper and make sure the print size is 100%. You might need to save the file and print using a photo application.

And please, if you use my artwork, send me a picture of what you made, so I can pin it to my pinterest board.

Week_10_layout

FIG. 1 Supplies: Wire cutters for cutting the coffee stirrers, scissors, tacky glue, craft knife, and ruler. Metallic or other thick crepe paper, strips of green crepe paper. Two printouts.

FIG. 2 Cut around the artwork and glue a coffee stirer to the back. Trim the stirrer flush with the bottom.

FIG. 3 Cut three rectangles of metalic crepe paper 5" wide with the grain running top to bottom. The stripe trophy will be 3 5/8" high, the dot trophy will be 2 5/8" high. The argyle trophy will be 3 1/4 high. Cut green crepe paper into 1/2" x 5" strips, with the grain running along the 5" length. Cut notches for grass. Glue grass on the bottom of the crepe paper. Let it dry. Roll into a tube and glue. Let it dry.

FIG. 4 Glue the trophies to the front and back of the tubes. Don't put glue on the tops of the handles. Let them dry. Stretch and twist each blade of grass to give it character.

FIG. 5 Squeeze and bend a curve in the artwork.

Continue reading

Week 9 {tiny paintings project}

Week_09


Tassels!  I saw a great photo of a llama wearing tassel earrings. So I had to make some.  These tassels have many other uses, not just llama earrings. These make great table numbers for all the party planning going on… with a matching tassel banner.  I think I’ll hang them from the handles of my storage boxes, dresser knobs, and door handles.  I would hang them from the lampshades, but I have two grade school-aged boys in my house – thus, no lamps. Tassels would look nice hanging from a Nerf gun though.

Get the artwork in the "artwork downloads" column to the right. Print it out on 4" x 6" photo paper and make sure the print size is 100%. You might need to save the file and print using a photo application.

And please, if you use my artwork, send me a picture of what you made, so I can pin it to my pinterest board.

Week_09_download_web

Week_09_layout

FIG. 1 Supplies: Drill and a tiny bit, small enough to fit tiny screw eyes. Tacky glue, scissors, thin yarn or twine, pipe cleaner, and the print out. Little log slices – I trimmed a branch off my olive tree aprox. 1 ¼” diameter, and cut it into ¼” slices with a saw in a miter box. If you can’t find a tree branch that needs trimming, you can use a dowel. Paper: I used a tissue paper napkin and silver leaf paper found in China town, crepe paper from last week’s project and some old book pages. Tissue paper is easiest for making tassels.

FIG. 2 Drill pilot holes (watch your fingers) and insert screw eyes. Glue the art to the medallion.

FIG. 3 Fold tissue paper in half and cut fringe, leaving about 1’ uncut at fold.

FIG. 4 Open the fold.

FIG. 5 Roll it up

FIG. 6 Twist the center tightly until it loops back on itself. You can add a dot of glue to secure it, and then wrap string around it.

FIG. 7 You can add a jump ring while you are twisting.

FIG. 8 Or add a contrasting paper layer while twisting.

FIG. 9 Or drill a hole through the medallion, to hang it on a nail.

Continue reading

Week 8 {tiny paintings project}

Week_08

Starting to think about Spring! These napkin rings would be pretty for weddings, parties, or picnics. I used gorgeously thick double-sided crepe paper from Castle In The Air, but I also like the idea of using old book pages with regular crepe paper, or tissue.

Get the artwork in the "artwork downloads" column to the right. Print it out on 4" x 6" photo paper and make sure the print size is 100%. You might need to save the file and print using a photo application.

And please, if you use my artwork, send me a picture of what you made, so I can pin it to my pinterest board.

Week_08_art_web


Week_08_layout

FIG. 1 Supplies: Six strips of card stock 1" x 6"long,six strips of crepe paper 2" x 8" long, six strips of crepe paper in 1 1/2" x 8" long, printout, 1/2" masking tape or washi tape, ruler, scissors, glue stick, and tacky glue.

FIG. 2 Cut around the artwork.

Fig. 3 Apply gluestick liberally to a piece of cardstock. Scrunch the wide crepe paper as you stick it down.

FIG. 4 Apply glue down the center and repeat with the narrow crepe paper. Stretch out the edges of the crepe paper to make ruffles

FIG. 5 Stick a piece of masking tape down the center, leaving 3/4" extending off one end.

FIG. 6 Close up the ring overlapping by 1/2 inch. Tape it down on the outside as well as the inside. If you used masking tape, you will probably have to use tacky glue to stick the photo paper to the tape. In the photo below it looks a little like the photo paper was stitched on. That's just part of the artwork, but wouldn't it be fun to stich all the layers together?

Single

Continue reading

Week 7 {tiny paintings project}

This Week: LETTER BUNTING

Week_07

Happy Valentines Day!

This could be a last minute valentine, or a head start on your next occasion. Print out as many copies of the artwork as you will need for duplicate letters. What would you like to declare?

Week_07_download_web

Get the artwork in the "artwork downloads" column to the right. Print it out on 4" x 6" photo paper and make sure the print size is 100%. You might need to save the file and print using a photo application.

And please, if you use my artwork, send me a picture of what you made, so I can pin it to my pinterest board.

Week_07_layout_web

FIG. 1 Supplies: Fabric glue, glitter, printouts, twine, craft knife, sponge brush, scissors and 1” wide ribbon.

FIG. 2 Cut out the flag letters that you will need to spell your word. Leave a small white border on the sides and bottom. Cut the top on the black outline. Apply glue to the white border.

FIG. 3 Dip the edges in glitter.

FIG. 4 Sweet!

FIG. 5 Cut the ribbon into 2” lengths. Glue a letter in the center of each ribbon.

FIG. 6 Fold the ribbon over the twine.


Continue reading

Week 6 {tiny paintings project}

This Week: LOVE BUGS

Week_06

I made these found-object bugs for Christmas presents with my kids, and then the whole class made them for an art auction fundraiser, Now the whole school is making bugs. They seem to be multiplying. Better these friendly bugs, than those other ones that went around school. Happy valentines day!

I used natural materials and string for these, but you could go sparkly too.  How about a bird made out of things found in a make-believe nest? Or a trophy head from a combo of different plastic animals?  A tiny knitting project? What else?

Week_06_art_web
Get the artwork in the "artwork downloads" column to the right. Print it out on 4" x 6" photo paper and make sure the print size is 100%. You might need to save the file and print using a photo application.

And please, if you use my artwork, send me a picture of what you made, so I can pin it to my pinterest board.

Week_06_layout

Fig. 1 Supplies: This Letraset double sided tape is working for me. I got the 1 ½” roll and I cover the back of the printout, and then cut it out. Printout, and mat board of a thickness that you are comfortable cutting. Metallic marker, craft knife, glue gun, and clippers. Bits of nature.

Fig. 2 Mount the artwork and cut around it just outside the black border. Color the edges and border with marker. Today I used bronze.

Fig. 3 Start with a wood chip or a stick for the base of the bug.

Fig. 4 Add legs. Give them some gesture. Don’t make everything symmetrical.

Fig. 5 Add wings, a head, and bits of color and pattern. Lentils and split peas make good eyes.

Fig. 6 Add antennae and decoration. Then turn the bug over and coat the back of delicate leaves twigs with hot glue to reinforce them.

Name your bug! 

BUG INSPIRATIONBugs

Class_bugs


Continue reading

Week 5 {tiny paintings project}

Week_5_badge

This Week: BADGE OF HONOR.
A prize for people who go out of their way to be nice. I'm making a bunch of them to hand out to all the people who have been so helpful with my new book project. No shirt pocket? You can fold the tab over a chain or ribbon and wear the badge as a necklace. Or, instead of the Museum badge style, you can mount the tiny painting on mat board, color the edges in silver, and glue a pin-back on it(like week 4 project). 

Get the high res. artwork in the ARTWORK DOWNLOADS column to the right. I've had resizing problems printing it straight from my browser. I suggest you save the artwork and print it using a photo viewing application. Use 4" x 6" photo paper. Please leave a comment if you have printing suggestions.

And please, if you use my artwork, send me a picture of what you made, so I can pin it to my pinterest board.

Fig. 1&2 Supplies: Wear gloves when cutting metal! If you are new to cutting metal, use an aluminum take out container or pie tin. If you’d like thicker metal, get a .016 aluminum sheet (I got this one at Ace hardware). Fine sand paper, bone folder, pencil, craft knife, ruler, and a cutting mat. Tape, this Letraset double-sided tape is nice because it has a paper backing so you can apply the tape to the back of the tiny painting printout, then cut through all the layers with the mat knife, making your own sticker. Metal shears, get small ones made for model making or jewelry. Large tin snips will be hard for this detailed work. The red ones are my favorite, blue are nice too.

Fig. 3 Cut as closely as possible to the edge of the badge artwork and then mount it on the sheet metal. Cut the metal around the artwork leaving an 1/8” border of metal showing. Don’t attempt to cut an inside curve with the shears. Snip into each groove from opposite sides. Use the bone folder to straighten out the metal but use a cover sheet so you don't scratch it. Lightly sand any sharp edges.

Fig. 4  Cut close to the edge of the certificate artwork, and then cut a piece of metal ¼” larger all the way around the certificate. Use the double-sided tape to mount the certificate to the backing and with the craft knife, cut a slit on the red line. With the certificate face down, fold 1/8” border back over the ruler to get a straight fold.

Fig. 5 Etch a decorative border with the pencil and insert the badge tab into the slot. You can write a reason for awarding the medal with a sharpie on the back, or print up an official looking statement and tape it to the back.


Continue reading